Milvus向量数据库07-向量数据库实战
版权声明:本文为博主原创文章,遵循 CC 4.0 BY-SA 版权协议,转载请附上原文出处链接和本声明。
本文链接:https://blog.csdn.net/2301_77717148/article/details/144383257
网上关于RAG的讲解太多,导致内容不聚焦,大家说的越来越不具象了,在此进行整理,各位按需取用,个人尝试代码仓库:https://gitee.com/enzoism/milvus_verctor_database
鸣谢:感谢每一位无私奉献的传道者,在此不一一具名!
1-学习目标
1)Milvus向量数据库使用场景拟定2)Milvus向量数据库背景知识3)Milvus向量数据库的增删改查
2-参考网址
个人尝试代码仓库:https://gitee.com/enzoism/milvus_verctor_databaseMilvus向量数据库03-搜索理论:https://blog.csdn.net/2301_77717148/article/details/144314159Milvus向量数据库04-Pipelines搭建RAG应用:https://blog.csdn.net/2301_77717148/article/details/144317934
3-执行过程记录
1-Milvus向量数据库使用场景拟定
场景说明:创建一个用户表,对比mysql的增删改查,完成数据库的创建/数据插入/索引创建/数据查询
2-Milvus向量数据库背景知识
在时间过程中发现的Milvus向量数据库背景知识,刚好今天在完成数据库操作知识整理实践之后,官方客服打电话过程中,也针对我使用过程中的疑问进行了验证。
1-支持向量数据直接写入

2-数据表创建两种方式

3-索引创建和Collection有关

4-索引查询和Collection有关

5-Collection付费版支持多向量属性

3-Milvus向量数据库的增删改查
场景拟定:从0到1进行向量数据库使用,先创建IngestionPipeline(同时会把collection也创建,完成collection和IngestionPipeline的绑定)
1-创建IngestionPipeline
使用网页进行创建IngestionPipeline(同时会把collection也创建,完成collection和IngestionPipeline的绑定)
创建Ingestion,选择【向量化类型】+【数据维度】+【embedding】

创建IngestionPipeline同时会把collection也创建,完成collection和IngestionPipeline的绑定

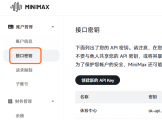
2-查看IngestionPipeline
网页上可以直接查看,我也记录了如何用接口进行查看
python查询IngestionPipeline详情
- from pymilvus import MilvusClient
- # 1-连接客户端
- client = MilvusClient(uri="https://in03-28a0c92a05bbf57.serverless.ali-cn-hangzhou.cloud.zilliz.com.cn", token="363e395f0ec26b5adbdc2deacc279d8e3476ec560dde3959d186aa5cb81e821a86b93c98bcc386bc5e494903d66ae847fb614b9b")# 2-查看Pipeline信息
- result = client.describe_collection(collection_name="usr_collection")print("\n",json.dumps(result))
- {"collection_name":"usr_collection","auto_id":true,"num_shards":1,"description":"usr_collection","fields":[{"field_id":100,"name":"Auto_id","description":"The Primary Key","type":5,"params":{},"auto_id":true,"is_primary":true},{"field_id":101,"name":"vector","description":"","type":101,"params":{"dim":5}},{"field_id":102,"name":"name","description":"用户姓名","type":21,"params":{"max_length":200}},{"field_id":103,"name":"age","description":"年龄","type":3,"params":{}},{"field_id":104,"name":"address","description":"地址","type":21,"params":{"max_length":200}},{"field_id":105,"name":"color","description":"颜色","type":21,"params":{"max_length":200}},{"field_id":106,"name":"usrId","description":"用户ID","type":3,"params":{}}],"functions":[],"aliases":[],"collection_id":454417515731180860,"consistency_level":2,"properties":{},"num_partitions":1,"enable_dynamic_field":true}
3-IngestionPipeline添加数据
python进行IngestionPipeline数据插入
- import json
- import requests
- # 设置请求的URL
- url ="https://controller.api.ali-cn-hangzhou.cloud.zilliz.com.cn/v1/pipelines/pipe-8b6be8d582a69184bad796/run"# 设置请求头
- headers ={"Content-Type":"application/json","Authorization":"Bearer 26c9a64315e62e89aea69ef7560c87d0bdf5f06ba58ab2639ad564bf227747c739b47fba5c859952ceb1eb49bd1f4f55aa0a6ff7"}# 设置请求体
- data ={"data":{"text_list":["Zilliz Cloud is a fully managed vector database and data services, empowering you to unlock the full potential of unstructured data for your AI applications.","It can store, index, and manage massive embedding vectors generated by deep neural networks and other machine learning (ML) models."],"color":"my color","age":123}}# 发送POST请求
- response = requests.post(url, headers=headers, data=json.dumps(data))# 打印响应print(response.status_code)print(json.dumps(response.json()))
- {"code":200,"data":{"num_entities":2,"usage":{"embedding":63},"ids":[454417515730834000,454417515730834000]}}
4-创建查询SearchPipeline
创建查询SearchPipeline时添加Function类型

点击确认创建SearchPipeline

5-SearchPipeline查询验证
界面直接可以查询

python进行SearchPipeline查询验证
- import json
- import requests
- # 设置请求的URL
- url ="https://controller.api.ali-cn-hangzhou.cloud.zilliz.com.cn/v1/pipelines/pipe-b22eb8274883e412df2ef9/run"# 设置请求头
- headers ={"Content-Type":"application/json","Authorization":"Bearer 26c9a64315e62e89aea69ef7560c87d0bdf5f06ba58ab2639ad564bf227747c739b47fba5c859952ceb1eb49bd1f4f55aa0a6ff7"}# 设置请求体
- data ={"data":{"query_text":"other"},"params":{"limit":1,"offset":0,"outputFields":[],"filter":"id >= 0"}}# 发送POST请求
- response = requests.post(url, headers=headers, data=json.dumps(data))# 打印响应print(response.status_code)print(json.dumps(response.json()))
- {"code":200,"data":{"result":[{"id":454417515730827500,"distance":0.7203079462051392,"text":"my other text"}],"usage":{"embedding":11,"rerank":0}}}
|


 广告
广告