提示模板
langchain hub prompt
可以从 langchain hub 拉去适合的模板来构成 prompt,例如 ReAct Agent,在下文中也提到了
Langchain hub 链接:https://blog.langchain.ac.cn/langchain-prompt-hub/,可以下载别人的 prompt,也可以管理自己的 prompt- from langchain import hub
- prompt = hub.pull("hwchase17/react")
适用场景
普通文本提示:适用于非对话式模型(如文本生成模型)单一文本输入:将用户输入和模板直接拼接为字符串简单场景:不需要区分系统、用户、AI 消息角色的场景
特点
生成纯文本提示通过 {} 定义变量插值输出格式为字符串
- from langchain_core.prompts import PromptTemplate
- # 定义模板
- template ="""你是一个翻译助手,将中文翻译成英文。
- 输入内容:{text}
- 翻译结果:"""# 创建 prompt
- prompt = PromptTemplate.from_template(template)# 格式化输入
- formatted_prompt = prompt_template.format(text="你好,世界!")# 输出 formatted_prompt:"""
- 你是一个翻译助手,将中文翻译成英文。
- 输入内容:你好,世界!
- 翻译结果:
- """
适用场景
对话式模型:专为聊天模型(如 ChatGPT、Qwen 等)设计多角色消息:需要区分系统指令、用户输入、AI 回复的场景复杂对话:需要动态插入对话历史的场景
特点
生成结构化消息列表支持角色标签(system, human, ai)输出格式为 ChatMessage 对象列表
- from langchain_core.prompts import ChatPromptTemplate, MessagesPlaceholder
- from langchain_core.messages import HumanMessage, SystemMessage
- # 创建 prompt(包含系统指令和动态历史)
- prompt = ChatPromptTemplate.from_messages([
- SystemMessage(content="你是一个专业翻译助手,当前时间:{time}"),
- MessagesPlaceholder(variable_name="chat_history"),# 动态注入历史
- HumanMessage(content="翻译这句话:{input}")])# 格式化输入(模拟对话历史)
- formatted_messages = prompt.format_messages(
- time="2024-01-01 10:00",
- chat_history=[
- HumanMessage(content="你好!"),
- AIMessage(content="Hello!")],input="今天天气很好")# 输出 formatted_prompt:"""
- [
- SystemMessage(content='你是一个专业翻译助手,当前时间:2024-01-01 10:00'),
- HumanMessage(content='你好!'),
- AIMessage(content='Hello!'),
- HumanMessage(content='翻译这句话:今天天气很好')
- ]
- """
LLMChain
- # 注意:LangChainDeprecationWarning: The class `LLMChain` was deprecated in LangChain 0.1.17 and will be removed in 1.0. Use :meth:`~RunnableSequence, e.g., `prompt | llm`` instead.from langchain.chains import LLMChain
- # 支持的功能示例
- chain = LLMChain(
- llm=llm,
- prompt=prompt,
- memory=memory,# 内置记忆管理
- output_key="result",# 自定义输出字段名
- verbose=True,# 开启详细日志
- callbacks=[handler],# 回调系统.....)
prompt 构造:prompt & json output parser- from langchain.prompts import PromptTemplate
- from langchain_core.output_parsers import JsonOutputParser
- # 输出 json 格式(对应 partial_variables,如果不需要约束去掉就好了 )
- json_schema ={"type":"object","properties":{"answer":{"type":"array","items":{"type":"string"}},"reason":{"type":"array","items":{"type":"string"}}},"required":["answer","reason"]}# 输出约束器
- output_parser = JsonOutputParser(json_schema=json_schema)# 提示模板
- prompt = PromptTemplate(
- template ='''
- Please strictly follow this format in your response, the JSON format should be:
- {json_schema}
- Example:
- {{
- "answer": {"我的回答是..."},
- "reason": {"我这样回答的的原因是..."}
- }}
- User's input: {input1}, {input2}
- Answer:
- ''',
- input_variables=["input1","input2"],# 用户输入, 可变
- partial_variables={"json_schema": output_parser.get_format_instructions()}# 直接在prompt模板初始化时候需要固定, 不可变)
- input_data ={"input1": user_input1,"input2": user_input2,}
- from langchain_openai import ChatOpenAI
- llm = ChatOpenAI(
- model="",
- openai_api_key="",
- openai_api_base="")
- # 方案1:管道式
- chain = prompt | llm | output_parser
- response = chain.invoke(input_data)# 方案2:LLMChainfrom langchain.chains import LLMChain
- chain = LLMChain(llm=llm, prompt=prompt, output_parser=output_parser, verbose=True)
- 短期记忆,内存存储ConversationBufferMemory(适合开发环境),需要使用ChatPromptTemplate
- from langchain.memory import ConversationBufferMemory
- from langchain_community.chat_message_histories import ChatMessageHistory
- from langchain_core.runnables import RunnablePassthrough
- from langchain_core.runnables.history import RunnableWithMessageHistory
- from langchain_core.prompts import ChatPromptTemplate, MessagesPlaceholder
- from langchain_openai import ChatOpenAI
- import datetime
- # 创建支持多会话的存储字典
- store ={}defget_session_history(session_id:str)-> ChatMessageHistory:if session_id notin store:
- store[session_id]= ChatMessageHistory()return store[session_id]# 初始化基础内存(可选,根据实际需求)【关键】
- memory = ConversationBufferMemory(
- return_messages=True,
- memory_key="chat_history")# 提示词模板 chat_history 对应 memory_key【关键】
- prompt = ChatPromptTemplate.from_messages([("system","你是一个专业助手,当前时间:{{time}}"),
- MessagesPlaceholder(variable_name="chat_history"),("human","{input}")])
- # 基础链配置
- base_chain =(
- RunnablePassthrough.assign(
- chat_history=lambda x: x["chat_history"],# 直接从输入中获取历史
- time=lambda_: datetime.datetime.now().strftime("%Y-%m-%d %H:%M"))| prompt
- | llm
- )# 最终链(正确配置多会话历史)
- chain = RunnableWithMessageHistory(
- base_chain,
- get_session_history,# 使用会话历史获取函数
- input_messages_key="input",
- history_messages_key="chat_history")# 第一轮调用
- response1 = chain.invoke({"input":"什么是量子叠加态?"},
- config={"configurable":{"session_id":"user_123"}})print(response1)# 第二轮调用(自动携带历史)
- response2 = chain.invoke({"input":"它与经典叠加有何不同?"},
- config={"configurable":{"session_id":"user_123"}})print(response2.content)
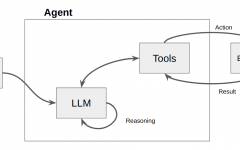
Agent
ReAct Agent
导入包- from langchain.agents import AgentExecutor, create_react_agent
- from langchain_core.prompts import PromptTemplate
- template ='''
- You are an assistant that strictly adheres to the required format. All outputs must follow the specified format and should not include any additional explanations or descriptions.
- Answer the following questions as best you can. You have access to the following tools:
- {tools}
- Use the following format:
- Question: the input question you must answer
- Thought: you should always think about what to do
- Action: the action to take, should be one of [{tool_names}]
- Action Input: the input to the action
- Observation: the result of the action
- ... (this Thought/Action/Action Input/Observation can repeat N times)
- Thought: I now know the final answer
- Final Answer: the final answer to the original input question
- Begin!
- Question: {input}
- Thought:{agent_scratchpad}'''# from_template创造简洁的模板,或者 langchain hub 拉取
- prompt = PromptTemplate.from_template(template)# prompt = hub.pull("hwchase17/react")
- tools =[]# 空的工具列表
- agent = create_react_agent(llm, tools=tools, prompt=prompt)# 创建 react 代理
- agent_executor = AgentExecutor(agent=agent, tools=tools, verbose=True, handle_parsing_errors=True)# 创建代理执行器,传递空工具列表
- # 形式1
- result = agent_executor.invoke({"input":"你是谁?你可以干什么?","chat_history":"",})# 形式2
- result = agent_executor.invoke({"input":"你是谁?你可以干什么?"})# 形式.....
- # 将复杂任务分解为可执行的子任务序列,通过工作流引擎协调多步骤执行。典型代表如 HuggingGPT,可将"生成营销方案"分解为市场分析→竞品研究→创意生成→预算分配等子任务。
- planning_steps =[{"step":"market_analysis","tool":"google_trends"},{"step":"competitor_research","tool":"similarweb"},{"step":"content_generation","tool":"gpt4"}]
- agent = create_planning_agent(
- llm = llm,
- workflow = planning_steps,
- fallback_strategy ="human_intervention"# 异常处理策略)
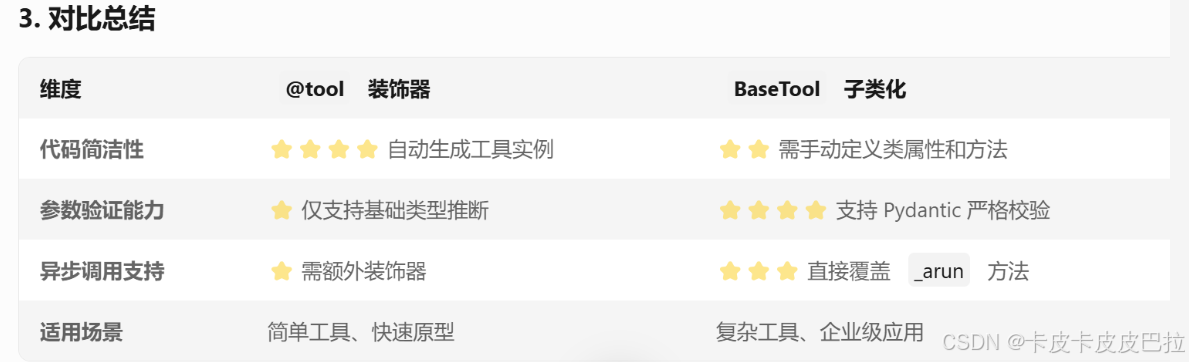
简单方法: @tool 装饰器
工具定义- from langchain.tools import tool
- from typing import Optional
- # 工具1:@tool(name="温度查询工具", description="输入地点名称,返回该地当前温度")defget_temperature(location:str)->str:...return"5℃"# 工具2:@tooldeftext_length(text:str)->int:"""计算输入文本的字符长度。输入应为文本内容。"""returnlen(text)# 注意
- 已使用 @tool 装饰器 → 无需再调用 Tool() 手动创建实例,直接引用函数即可
- from langchain.tools import tool
- textLen_tool = Tool(name="text_length", func=text_length, description="计算输入文本的字符长度"# 测试调用
- temperature = get_temperature("北京")
- tools =[get_temperature, text_length]
- agent = create_react_agent(llm, tools=tools, prompt=prompt)
- agent_executor = AgentExecutor(agent=agent, tools=tools, verbose=True, handle_parsing_errors=True)
- result = agent_executor.invoke({"input":"北京现在温度多少?"})
- from langchain.tools import BaseTool
- from pydantic import BaseModel, Field
- # 步骤1:定义输入参数schema(支持参数验证)classWeatherQueryInput(BaseModel):
- location:str= Field(..., description="需要查询天气的城市名称,如:北京")
- date:str= Field(default="今天", description="查询日期,默认为今天")# 步骤2:继承BaseTool创建工具类classGetWeatherTool(BaseTool):
- name:str="weather_query"
- description:str="根据城市名称和日期查询天气信息"# doc_string 明确需求
- args_schema: Type[BaseModel]= WeatherQueryInput # 绑定输入schemadef_run(self, location:str, date:str="今天")->str:# doc_string, 明确工具执行逻辑"""
- 调用天气API并返回结构化结果(此处简化逻辑)
-
- 参数示例:
- location="北京", date="明天" → 返回"北京明天晴,气温20℃~28℃"
- """# 模拟数据(实际开发需替换为真实API)
- mock_data ={("北京","今天"):"晴,25℃",("北京","明天"):"多云,23℃~28℃",("上海","今天"):"小雨,20℃"}return mock_data.get((location, date),"暂未获取该城市天气信息")# 步骤3:工具初始化与使用
- weather_tool = GetWeatherTool()# 测试调用(自动验证参数类型)print(weather_tool.run({"location":"上海","date":"今天"}))# 输出:小雨,20℃
- tools =[weather_tool]# 或 tools = [GetWeatherTool()]
- agent = create_react_agent(llm, tools=tools, prompt=prompt)
- agent_executor = AgentExecutor(agent=agent, tools=tools, verbose=True, handle_parsing_errors=True)
- result = agent_executor.invoke({"input":"北京现在温度多少?"})
 |


 广告
广告